Tuesday, September 29, 2015

Conducting operations with a multi rotor UAS

Introduction:
For this lab we went out to the soccer fields once again to practice conducting preflight operations with a multi rotor UAS. This consisted of going through preflight checks as both the Pilot in Command (PIC) and the Pilot at the Controls (PAC). We were spilt up into the same groups as last week and when one group was working with the multi rotor, the others were learning more about batteries from Doc P.

Study Area:
The study area was located at the soccer fields south of Hamilton Road and southwest of Bollinger Fields (Figure 1). Each group created and flew their own mission but to some extent everyone's mission was located over the pavilion as shown in Figure 2 below.
Figure 1: Aerial locating the study in relation to UWEC and Bollinger Fields

Figure 2: Aerial locating the study area in relation to our home base
Methods:
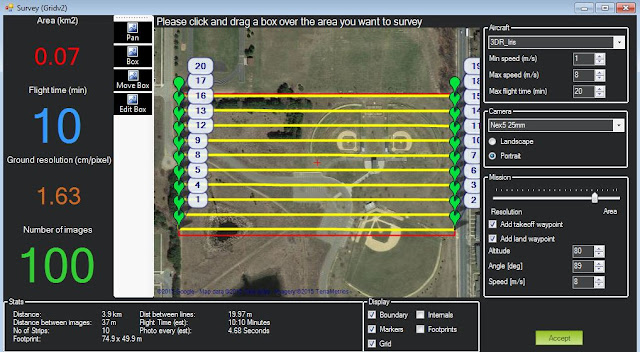
I was put as the Pilot at the Controls so I will go through all the steps that I needed to take to ensure that everything flowed smoothly as possible for this mission. First, I created the mission on Mission Planner (Figure 3) and worked with all the different parameters so that my flight was the most efficient it could be. Examples of efficiency would be making sure that I am not taking unnecessary passes over the study area and that I am flying at the optimal height for sensor capture. One big parameter that you can set is the angle of the flight path so that you take long passes over the study area to minimalize the time it takes to turn around cause it can really add up when your battery is getting low. Once the flight plan is made then I would start the rest of the checklist (Table 1) which includes writing the mission I just created to the aircraft and then reading it back so I am absolutely sure that it received the correct mission and then writing it one more time.
Figure 3: Photo showing myself as the Pilot at the Controls (PAC) creating the mission

Table 1: Checklist for a Multi Rotor aircraft 


Other checks that I had to run through would be commands to the Pilot in Command whose job is was to run the checks on the aircraft itself. These consisted of making sure that all the electrical connections are secure, as well as if the props had any cracks in them. If any of these checks were not performed and something happened during the flight, then the aircraft could crash and cause significant damage to itself or even worse, a spectator. The PAC is also in charge of making sure that the flight area is secure and that there is no inclement weather that could harm the mission. There needs to be constant communication between the PAC and the PIC. The PAC needs to check the battery often to make sure that nothing is causing it to drop, as well make sure that there are always enough satellites so that we can continue with the mission. Once all the preflight checks have been made then we can move on to the takeoff sequence. This also involves the PAC making sure that the checklist is completely covered (Figure 4) and the PIC is ready to take over. Once the Transmitter (TX) is turned on and the base station gives control to the PIC then they are responsible to make sure they safely land the aircraft should something go wrong.
 

Figure 4: Photo showing myself as the Pilot at the Controls (PAC) finishing the checklist
At this point we start the flight and the autopilot takes over and flies the mission. The job of the PAC is to not watch the aircraft but watch the software and make sure nothing goes haywire such as the battery or number of satellites. The roar of the multi rotor is rather loud at first but once it gets up in the air to the flight height of 70 meters, it is not as noticeable. As I continue to watch the computer as the PIC, I inform the PIC when the aircraft is on its way back so they can be ready for the landing. Most of the time the PIC will allow the autopilot to land the aircraft unless they see something wrong and in that case they will override the autopilot. Once the aircraft has landed we go through a very short post flight checklist which is pretty much making sure everything is then disconnected as safe for transport out of the study area.

Discussion:
Although we did nothing with the data, it is very important that this lab was implemented into this course. Without the knowledge and knowhow of how to safely takeoff and land a mission, this could be a very dangerous undertaking. This is one instance of when you need to put down everything else and completely focus on the task at hand. You cannot relax and you cannot snooze off or ever take your eyes off of the task. For the PAC the task is the computer screen and making sure that nothing goes wrong, because if something does go wrong, you will notice it on the computer screen before you see it anywhere else. For the PIC the task is the aircraft itself, because in the event something does go wrong they need to immediately take over and take quick action without having to find the aircraft in the sky first. Now as a spectator, you also need to be paying attention to whatever is going on and always keep your head on a swivel just in case something does happen. We don't want any harm to occur to the aircraft but even more so we don't anybody to get hurt and/or worse.

Conclusion:
To truly respect UAS, you must understand what they are capable of and know that in the event of a worse case scenario, how do you fix the problem or how do you minimalize the damage that is going to occur. Another reason to go through this checklist is to have a record of everything that has been done. Ex: Who is the PAC or PIC, have all the checks been run, what is the aircraft and what batteries are you using as well as the time of day, location, and weather!


Wednesday, September 23, 2015

Multi Rotor aircraft Simulation

Introduction:
For this lab we simulated using a multi-rotor aircraft in an automated mission while also going through all the preflight checks. To plan the mission we used a mission planning software called Mission Planner. Once we created our own theoretical mission, we went outside to practice going through the pre flight checks from a pilot at command perspective and a pilot at the controls perspective.

Study Area:
There really was not a study area since this was just practice for flying a mission, but in the mission planning software we did "plan" our mission on the baseball diamonds south of Eau Claire South Middle School (Figure 1). While we went through the preflight checklists we were just outside Phillips Hall in the Campus Mall at UWEC (Figure 2). While we were going though the preflight checks, we had winds at 3 miles per hour out of the south southeast and cumuloaltostratus clouds aloft. There was periodic times where we had moments of no wind at all which would have made for interesting flying conditions.
Figure 1: Location of the Mission Planning software demo.

Figure 2: Location of Preflight Simulation demo

Methods:
We were first introduced to the Mission Planner in the lab where we went over all the different decisions that need to be made to assure that you have the optimally planned your flight. One aspect of UAS is that they cannot stay in the air for an indefinite amount of time and therefore they need to land due to battery loss. By orienting the flight path in a different way however, we can save time so that we can fly the whole mission without having to switch out batteries. For example we can fly a field that is 50 meters by 75 meters two different ways. One way is to make 50 meter swaths     (Figure 3) and then turn around and line up for the next swath through. This is acceptable however, if we made 100 foot swaths (Figure 4) we would limit the amount of time needed to turn around for the next swath. This would save time and money and make the flight much more efficient. You can see that changing the angle to your advantage, shortens the flight time. It may not be much on this mission but for others it can be an astronomical difference and can be the deciding factor on whether or not you can fly.
Figure 3: Mission Planning software showing a less efficient flight path.

Figure 4: Mission Planning software showing a more efficient flight path.

For our second part of the lab we went outside to simulate going through the checklist of taking off with a multi rotor aircraft. During this process, a team is made up of two to three people. The first person is the Pilot at the Controls (PAC) who is in charge of the checklist and all the conditions of the flight. The PAC is on the computer making sure that the mission planning software is linked with the aircraft and that all the preflight checks are being made. The pilot in control (PIC) is hands on with the aircraft, actually doing all the checks that the PAC is reading off. Some of the checks include making sure the prop is secure along with the battery and making sure that the transmitter (TX) is ready to go. The third person would be the spotter who is pretty much helping the other two and making the sure that the flight area is consistently secure. You can look at Table 1 for a complete listing of the preflight checks as well as the multicopter log (Table 2) which records who is the PAC, PIC, and spotter is, along with the actual flight data.
Table 1: Multicopter Check List showing all the different preflight, flight, and postflight checks.

Table 2: Multicopter Log Book showing all the flight data.
Results and Discussion:
There isn't much for results in this lab since no data was produced, but we still gained valuable knowledge as far as how to safely and efficiently start a mission. Without going through all the preflight checks, you could easily forget to do something very important and that could result in a major crash and injury to the aircraft or injury to one of the pilots or a helpless bystander. One of the checks that I found very important is to keep the flight area secure. If there are bystanders in the area and something goes wrong they could start to panic and then have a very negative view of UAS and UAVs. This would be an insult to the entire UAS industry which if you haven't noticed, is already going through a lot of political backlash due to the nature of UAS. Most people may not understand UAS, but by having a record of preflight checks along with a logbook, people can be held responsible for their actions and the public can begin to trust UAS pilots and realize that the opportunities that can come from this systems are endless and can help many people.

Conclusion:
Now that we have learned how to create missions and the checks needed to actually start them, we can enter the next step of learning more about UAS. This can include the actual flying of the aircrafts, as well as image processing and many more avenues. None of these are possible however with making sure that everything is safe and that the UAV is functioning properly.

Wednesday, September 16, 2015

Image gathering fundamentals

Introduction:
On Wednesday September 9th our UAS class went out to the soccer fields across from Bollinger fields to learn more about how to gather imagery from a UAS platform. We had literally no winds with decent cloud cover which made for a comfortable flight. Both Professor Hupy and Pierson were present and due to the lack of wind, they decided to use a large balloon instead of a kite. Attached to the balloon was a pair of cameras and once the balloon was launched it was up to the class to survey the soccer field. At the same time, Professor Hupy brought out his Phantom to take some images of the balloon rig and to gather more information about how this lab was working. Towards the end of the lab it started to rain and we ceased all further flight after learning more about what helium does to your vocal pitch.

Study Area:
Our study consisted of 10.3 acres of soccer fields located south of Hamilton Avenue in Eau Claire, WI. We were kitty corner to the University's "Bollinger Fields". Like I said earlier, there was virtually no winds with decent cloud cover and rain towards the end of the lab. We set up base in the parking lot on the southwest corner of the complex where set everything up before flying.
Map depicting the study area in regards to the University and Bollinger Fields.

Map showing the study area outlined in yellow, along with our base as shown by the star.
Although the balloon survey took quite a while, 67 degrees is fair flight weather which allowed for no students to become fatigued.

Methods:
Once the entire class was present we started the lab. We first had to fill the balloon up with helium which took some time. Professor Hupy brought a large helium tank that was strapped to the tailgate of his truck.
Professor Hupy and Dakota Dorn filling the balloon with helium.
Once the balloon was inflated enough we set up the picavet rig. A picavet rig is a suspension system designed to keep the cameras we attached relatively level to the ground no matter what the balloon is doing. This rig is commonly used for aerial kite photography as well. In the picture below you will see the picavet rig being held and then attached on the guideline of the balloon. It was attached approximately 20-25 feet below the balloon.
From left to right: Professor Pierson, Michael Bomber, and Professor Hupy begin attaching the rig.
 During the entire process of setting up the balloon and cameras for departure, we had a safety line attached to the balloon in case the guide line snapped. This would allow us to continue working instead of watching the balloon rise into the tropopause.
Removing the safety line while also attaching the picavet rig.
 Once the rig was set up, we then had to turn on the cameras that were equipped with CHDK, which stands for Canon Hack Development Kit. This allowed us to manipulate the camera any way that we wanted and Professor Hupy was able to change one of the cameras to shoot infrared. So with two separate cameras that are completely identical, one shoots infrared while the other shoots in RGB.